
![]()
Here is a simple temperature controller suitable for a variety of purposes;
it was designed to heat the copper float out of a toilet for a barometer! The values and components are not
critical; the components shown were selected primarily for easy availability. The temperature setting resistor depends on the
NTC type thermistor and should be selected to heat the oven to the desired
operating temperature. Temporarily connect a current meter in series with the power supply to monitor the oven's performance. The circuit should draw about 500 ma until the set point is reached and then the current should cut back to about 200 ma (depending on the set
temperature, oven structure, and insulation quality). A little cycling before settling is fine but if the current cuts on and off repeatedly, then move the thermistor closer to the heater resistor or decrease the 330k resistor.
Higher heating current may be achieved by lowering the value of the heater
resistors but at some point the power transistor dissipation may become too
high.
Higher resistance negative temp-co thermistors may be used by increasing the resistor connecting from the thermistor to the zener by a proportional amount. The thermistor and 270 ohm resistors are mounted on the float
(or other metal oven structure) and the other components are mounted in a separate metal box. To simplify construction, connect the
oven structure to the negative terminal of the supply (negative ground) and connect the metal circuit box to the positive terminal (positive ground). This wiring allows the resistors and thermistors to be directly soldered to the
oven structure and it allows the 2N3055 to be directly connected to the metal case without insulating hardware. Obviously, the case must not touch the
oven structure.
![]()
Below is a temperature controller capable of extremely precise control. See https://www.techlib.com/electronics/barometer.html for the oven structure details to make an oven as good as any commercial products with parts from the local plumbing supply house!
![]()
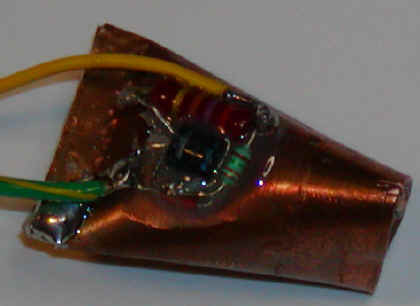
The oven controller below is about as simple at they get! It uses a TL431 shunt regulator as the error amplifier and power controller and only three other components. The temperature set by the 18k resistor and the 220 ohm, 1 watt resistor provides the heat, along with the TL431 itself. The oven structure is made by completely flattening one end a 1.25" long piece of 1/2 inch copper tubing with a vise, turning it 90 degrees and flattening the other end, leaving enough of an opening to accommodate the parts to be ovenized. The components are soldered and glued directly to the copper as seen in the photo. The thermistor is a bit difficult to see; it is the orange component that looks similar to a diode buried in the epoxy at the bottom of the photo. The thermal gain of this oven will be about 20 or 30 when it is inside a 2" x 2" x 2" Styrofoam insulator which is sufficient to greatly improve the performance of voltage references, crystal oscillators, etc. To achieve best performance use long lead wires for the circuits in the oven and tuck several inches of wire inside the oven after the circuit to prevent heat loss out the wires.
Warm-up current is about 50 mA and operating current is only about 25 mA with the foam described above. The operating temperature is about 50° C with a 10k NTC thermistor with a 3%/°C slope. Other NTC thermistors will work but the 18k resistor must be changed to set the proper operating point.
 |
 |
![]()